
Yellow Chevron Curtains
I am beyond excited to finally get to share my yellow chevron curtains with you! Chevrons and I have had a love affair for quite some time now. Are chevrons still the “in” thing? Or has that craze passed? Obviously, it really doesn’t matter to me. I think chevron is a very classic pattern.
When I finally decided on a gray and yellow color scheme for our living room (after living here a year) I knew that I just HAD TO HAVE big bold chevron curtains. I did some research and found that the chevron curtains that I liked were selling for about $125!! YIKES. I knew that was not going to fly. So I did what I always do. I found a way to make what I wanted for less.

You will need a square, something to mark on your curtains, blue painters tape, paint, and of course, curtains.

The horizontal distance between my chevrons was 14 inches. Your measurements will be different depending on you want your chevrons to look. I continued to measure 14 inches between peaks and 6 inches down. I then used my square as a guide to place the tape onto the curtains, making sure that the tape lines stay straight. Finish taping one row of chevrons and then move down to the next row. Continue to tape across and down your curtain. This is the tedious part. You might want to give up but I’m telling you..don’t. It is worth it in the end.
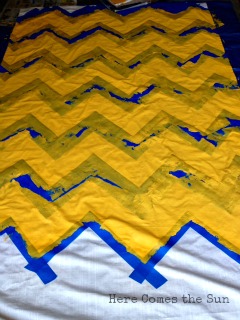
The light in my garage was sooo not good this day!
I left some white space at the bottom of the curtain but you could paint the chevrons to the bottom. It’s totally up to you.
I would suggest a small roller instead of a larger one. Also, to ensure that paint does not seep under the tape, roll from the tape toward the center of your chevron. Does this make sense? If you roll from the middle of your chevron toward the tape, you are more likely to push paint under the tape which is not the result that we are going for. Give it a good coat of paint. You may want to do two coats. I only did one and I had to do some touch ups after I put the curtains up and noticed some thin spots when the light shined through. You can see the thin spots in the picture below.


I absolutely LOVE them. They make such a bold statement in the room. I love it because you see them right when you walk in the front door. One of the problems that I find with renting is that you can’t paint the walls. I think these curtains add tons of color to the room and go well with the neutral {blah} walls. I was worried that the bold color would not work well in the Fall. {I actually made these this past summer.} I thought the yellow was more of a summer color but now that I see it with my Fall Mantel, I think it works well.

Do you have a bold statement in your house?
Beautiful! I love how these turned out! You clearly put a lot of work into them….totally worth it in the end though :o)
This is awesome! I’m going to try to recreate…I hope mine turn out as beautiful as yours!!
Devan
Super Messy Supermommy
I have been really loving the yellow/gray/white combo- add chevrons & I’m pretty happy. This came out great!
I want some now! Those are too cute! I don’t think the chevron craze has ended. It’s too cute to end!
Love these! Patience is right! ;p I started to do the same thing with curtains for my guest room 3 months ago! I got through one panel & have 3 more to go! ha. I’m gonna keep coming back to your post to give my inspiration to keep pushing forward! :p Great job. <3 Heidi Rew from Parties for Pennies
Found you at the CHQ blog hop. Love your chevron curtains. Following you through Linky Followers.
Leslie
House on the Way
Love. Two of my favorites: chevron and yellow! Beautiful!
Beautiful curtains I will follow you.
Home theatre curtains
Beautiful curtains! They look so happy!
I’m so glad that I’m following you! Your curtains looks awesome. Thank you so much for sharing your awesome work:)
Katie
http://www.funhomethings.com
They brighten up that room SO well! I need some!
I am hosting a Weekend Warmth party over at my blog and would love to have you share something!
http://westernwarmth.blogspot.com/
Bobi
these are GLORIOUS!! Lovin’ the fab bright sunny color too!
So beautiful Kelly!! Great job. Painting curtains always scares the crap out of me, but you made it look pretty easy. Thanks for partying with me.:)
Thanks for joining Keep Calm & Link Up last week! We hope to see you again this Thursday evening! xo, Meredith @ http://www.waittilyourfathergetshome.com
I actually thought about doing this with stripes!!! And I still may cuz ya showed us how it’s done!! Love it
Kim
I am featuring your drapes tomorrow!
Kim~madeinaday
Fantastic job! The colors match your sunny personality! I’d love it if you shared this at my linky party on Friday at OneCreativeMommy.com.
They turned out fantastic!These curtains are fabulous,Give extra shining to the room.Thanks for sharing.
Sheer curtains
The lovely Chevron curtains shown here are beautiful.You will love to look at it
Wallpapers
From viewing these design concepts, I think the pattern and length of the curtains can complement these vertical blinds as secondary layer. I think it looks good.
Do you think this can work on motorised curtains and blinds too? I never tried DIY curtain painting so I do not have any idea if that will work. It looks cool and I want the yellow color design because it brightens up a room.
Love these! Great job! I’m your newest follower by the way, can’t wait to see more!
Ashli
thegrayhouseontheleft.blogspot.com
I love it! You are so very creative and resourceful. I like using curtains too but our house is directly facing the sunlight so for added protection, we also installed roller shutters.
I’m planning on trying to make these for baby’s nursery. Just wanted to know…how much tape will I need?
Probably a couple rolls of painters tape.
Yeah, that’s pretty impressive. A personal touch gives the living room a warm ambiance. I noticed those cute little round frames above the fireplace too. Very nice and homey design.
I can not tell you how happy I am to have found your blog! Thank you for such detailed and clear instructions on this. I am making curtains right now (for the first time ever) and they’re white and I wanted to paint them with a yellow chevron pattern but I suck at figuring out the math part. Using this as a guide will help so much! I’m buying the paint tomorrow morning and I can not wait to start on this! Thank you Thank you!!
I’m so glad I was able to help you!